Are you tired of hitting snags with your sewing projects due to issues with your zigzag stitch sewing machine? Don’t fret! We understand the frustration that comes with troubleshooting sewing machines, especially when your creative flow is interrupted.
Whether it’s skipped stitches, tension problems, or bobbin issues, navigating the complexities of sewing machine hiccups can be daunting. But fear not, as we’re here to guide you through the maze of troubleshooting woes. In this comprehensive guide, we’ll delve into zigzag stitch sewing machine troubleshooting, offering practical solutions to keep your sewing journey smooth and uninterrupted.
Contents
- 1 Salient Points
- 2 How to Do Zigzag Stitch Sewing Machine Troubleshooting?
- 3 Why is Zigzag Stitch Coming Out Straight?
- 4 Maintenance Tips for Sewing Machines
- 5 Conclusion
- 6 References
- 7 Frequently Asked Questions
- 7.1 How Do I Clean and Maintain My Zigzag Stitch Sewing Machine?
- 7.2 What Type of Thread Should I Use for Zigzag Stitching?
- 7.3 How Do I Adjust the Stitch Width and Length on My Sewing Machine?
- 7.4 What Are Some Common Reasons for Skipped Stitches in Zigzag Stitching?
- 7.5 How Can I Troubleshoot if My Sewing Machine Is Not Turning on or Has No Power?
Salient Points
- Verify Pattern Selection: Ensure pattern 3 is selected on the dial for zigzag stitching.
- Adjust Stitch Width: Set the width between 1-5 to prevent stitching irregularities.
- Maintain Needle Integrity: Insert a new needle with the flat side facing back to avoid stitching problems.
- Clean Needle Plate: Remove debris underneath to promote smooth needle movement and consistent stitching.
How to Do Zigzag Stitch Sewing Machine Troubleshooting?
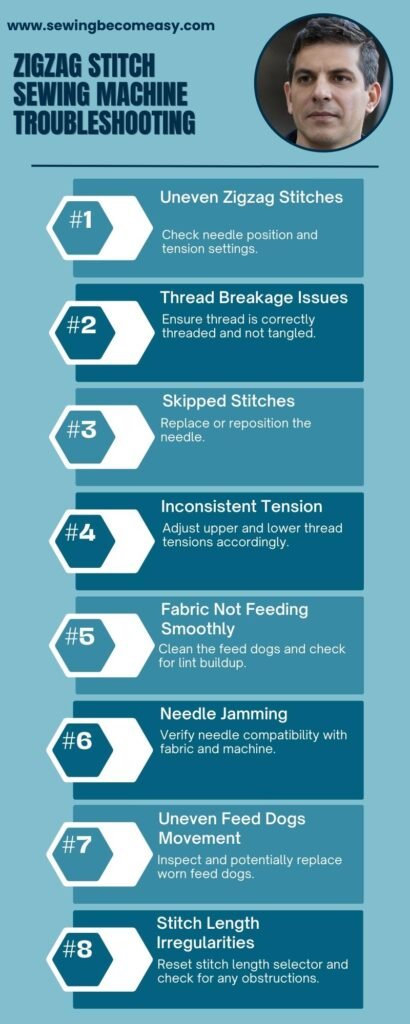
Having trouble with zigzag stitch on your sewing machine? Follow these troubleshooting steps to address common issues and ensure smooth stitching.
- Verify Stitch Selection:
- Check if pattern 3 is selected on the pattern selection dial. Incorrect selection can lead to irregular zigzag stitches.
- Adjust Stitch Width:
- Set the stitch width between 1-5. Incorrect width settings may cause stitching problems like skipped stitches or uneven zigzag patterns.
- Change Needle:
- Insert a new needle into the machine, ensuring the flat side faces the back. A dull or bent needle can result in poor zigzag stitching.
- Clean Needle Plate:
- Remove the needle plate and clean underneath to remove any lint or loose threads. Accumulated debris can interfere with the needle’s movement, affecting stitch quality.
- Check Thread Tension:
- Ensure proper thread tension for both upper and bobbin threads. Incorrect tension can cause thread bunching or looping, affecting zigzag stitching.
- Inspect Bobbin Case:
- Examine the bobbin case for any tangled threads or debris. Clean if necessary to prevent interference with the bobbin thread.
- Thread Path Verification:
- Double-check the thread path to ensure it follows the correct sequence. Misplaced threads can lead to stitching issues, including zigzag stitch malfunctions.
- Machine Lubrication:
- Lubricate the sewing machine as per manufacturer’s instructions. Lack of lubrication can cause mechanical issues, affecting zigzag stitch performance.
- Test Stitch on Scrap Fabric:
- Before resuming regular sewing, conduct a test stitch on a scrap fabric to verify that the troubleshooting steps have resolved the issue.
Let’s discuss these troubleshooting steps in detail now.
Verify Stitch Selection
To ensure your zigzag stitch works correctly, begin by confirming that pattern 3 is selected on the pattern selection dial of your sewing machine. This step is crucial because selecting the wrong pattern can lead to irregular stitching results.
- Locate the Pattern Selection Dial: Look for the dial on your sewing machine that allows you to choose different stitch patterns. It’s usually located on the front panel or near the needle area.
- Rotate the Dial to Pattern 3: Turn the dial until it aligns with the number corresponding to pattern 3. Make sure the dial clicks into place to secure the selection.
- Double-Check the Setting: Take a moment to verify that the indicator or marker on the dial aligns precisely with pattern 3. This confirms that your sewing machine is set up to execute zigzag stitches correctly.
Adjust Stitch Width
Proper stitch width settings are essential for achieving uniform and precise zigzag stitches. Follow these steps to adjust the stitch width within the recommended range of 1-5:
- Locate the Stitch Width Control: Look for the knob or dial on your sewing machine that controls the stitch width. It’s often positioned near the pattern selection dial or labeled with “Width.”
- Set the Width to a Suitable Range: Turn the knob or dial to adjust the stitch width within the range of 1-5. Start with a mid-range setting (e.g., 3) for standard zigzag stitching.
- Test the Width Setting: Sew a test stitch on a scrap piece of fabric to evaluate the width. If the zigzag stitches appear too narrow or wide, fine-tune the width setting accordingly until you achieve the desired result.
Change Needle
A sharp and properly inserted needle is crucial for smooth and accurate zigzag stitching. Follow these steps to change the needle on your sewing machine:
- Select a New Needle: Choose a new needle suitable for the fabric you’re working with. Needles come in various sizes and types, so ensure you have the correct one for your project.
- Turn Off the Machine: Before proceeding, switch off your sewing machine and unplug it from the power source for safety.
- Remove the Old Needle: Use a small wrench or screwdriver to loosen the screw securing the needle in place. Carefully remove the old needle by pulling it down and away from the machine.
- Insert the New Needle: Position the new needle with the flat side facing the back of the machine. Slide it up into the needle clamp holder as far as it will go, then tighten the screw to secure it in place.
Clean Needle Plate
A clean needle plate is essential for preventing stitching problems caused by lint or loose threads buildup. Follow these steps to clean the needle plate of your sewing machine:
- Turn Off the Machine: Before cleaning the needle plate, ensure your sewing machine is switched off and unplugged from the power source to avoid any accidents.
- Remove the Needle Plate: Locate the needle plate cover beneath the presser foot and use a screwdriver to loosen the screws holding it in place. Carefully lift off the needle plate cover and set it aside.
- Inspect for Debris: Check the needle plate area for any accumulated lint, dust, or loose threads. Use a small brush or a lint roller to remove these debris gently.
- Clean Underneath the Plate: With the needle plate removed, you’ll have access to the space beneath it. Use a brush, tweezers, or a vacuum with a nozzle attachment to thoroughly clean this area, ensuring all debris is removed.
- Reassemble the Needle Plate: Once the needle plate and surrounding area are clean, carefully place the needle plate cover back into position. Tighten the screws securely to hold it in place.
Check Thread Tension
Proper thread tension is critical for achieving balanced zigzag stitches without puckering or loose loops. Follow these steps to check and adjust the thread tension on your sewing machine:
- Thread the Machine: Begin by threading both the upper thread and the bobbin thread through their respective guides and tension discs according to your sewing machine’s threading diagram.
- Set the Tension Dial: Locate the tension dial on your sewing machine, usually situated near the top or front panel. Set the tension dial to the recommended setting for zigzag stitching, typically between 3-5.
- Test Stitch on Scrap Fabric: Sew a test stitch on a scrap piece of fabric using your desired zigzag pattern. Inspect the stitch quality to determine if the tension needs adjustment.
- Adjust Tension as Needed: If the stitches appear too tight (resulting in puckering) or too loose (resulting in loops), make small adjustments to the tension dial. Turn the dial slightly clockwise to increase tension or counterclockwise to decrease tension.
Inspect Bobbin Case
A clean and properly functioning bobbin case is essential for smooth bobbin thread delivery, which contributes to well-formed zigzag stitches. Follow these steps to inspect and clean the bobbin case:
- Remove the Bobbin Case: Open the bobbin compartment of your sewing machine and remove the bobbin case according to the manufacturer’s instructions. Some machines may have a latch or release button to facilitate removal.
- Inspect for Debris: Examine the bobbin case and surrounding area for any tangled threads, lint, or foreign objects. Use a pair of tweezers or a small brush to gently remove any debris.
- Clean the Bobbin Case: Wipe the bobbin case clean with a soft, dry cloth to remove any remaining debris or oil buildup. Avoid using compressed air, as it may push debris further into the machine.
- Reinsert the Bobbin Case: Once the bobbin case is clean, reinsert it into the bobbin compartment, ensuring it is properly seated and aligned according to the machine’s markings or guides.
Thread Path Verification
Verifying the thread path ensures that the threads are correctly routed through the machine, which is crucial for smooth zigzag stitching. Follow these steps to confirm the thread path:
- Consult Machine Manual: Refer to your sewing machine’s manual to familiarize yourself with the correct thread path for zigzag stitching. The manual typically includes diagrams or instructions for threading the upper thread and bobbin thread.
- Thread Upper Thread: Begin by threading the upper thread through the designated guides and tension discs, following the path outlined in the manual. Ensure the thread passes through any thread guides, tension discs, and the needle’s eye in the correct sequence.
- Thread Bobbin Thread: Wind a bobbin with the desired thread and insert it into the bobbin case following the instructions provided in the manual. Make sure the bobbin thread is properly threaded through the bobbin case tension spring and positioned correctly.
- Verify Thread Path: Once both the upper thread and bobbin thread are threaded, visually inspect the entire thread path to ensure there are no tangles, knots, or misrouted threads. Follow the thread path from the spool holder to the needle and from the bobbin case to the needle plate.
- Test Stitch: After confirming the thread path, conduct a test stitch on a scrap piece of fabric to ensure that both the upper and bobbin threads are correctly feeding into the machine and producing smooth zigzag stitches.
Machine Lubrication
Proper machine lubrication ensures smooth operation of moving parts, reducing friction and wear, which can impact zigzag stitch quality. Follow these steps to lubricate your sewing machine:
- Refer to Manual: Consult your sewing machine’s manual to identify the lubrication points and recommended lubricant type. Different machines may require specific lubricants and have varying lubrication intervals.
- Turn Off Machine: Before lubricating, ensure that your sewing machine is turned off and unplugged from the power source to prevent accidents.
- Apply Lubricant: Using the appropriate lubricant specified in the manual, apply a small amount to each designated lubrication point. Common lubrication points include moving joints, gears, and shafts.
- Operate Machine: After lubricating the machine, manually operate the handwheel or run the machine at a slow speed to distribute the lubricant evenly across the moving parts.
- Wipe Excess Lubricant: Use a clean, lint-free cloth to wipe away any excess lubricant from the machine’s surface to prevent it from transferring onto fabric during sewing.
Test Stitch on Scrap Fabric
Performing a test stitch on scrap fabric allows you to evaluate the effectiveness of the troubleshooting steps and ensure that the zigzag stitch is functioning correctly. Follow these steps to conduct a test stitch:
- Prepare Scrap Fabric: Cut a small piece of scrap fabric similar to the material you intend to sew. Fold the fabric if necessary to simulate actual sewing conditions.
- Select Zigzag Stitch: Set your sewing machine to the desired zigzag stitch pattern and adjust the stitch width and length settings as needed for your project.
- Position Fabric: Place the prepared scrap fabric under the presser foot, aligning it with the desired stitching line or seam allowance.
- Begin Stitching: Lower the presser foot and gently lower the needle into the fabric. Start sewing at a slow to moderate speed, guiding the fabric evenly as the machine stitches.
- Inspect Stitch Quality: After completing the test stitch, carefully examine the stitch quality, checking for uniformity, tension, and any irregularities such as skipped stitches or thread bunching.
Why is Zigzag Stitch Coming Out Straight?
Zigzag stitches are commonly used in sewing to provide flexibility and prevent fraying of fabric edges. However, if you find your zigzag stitch coming out straight, it might be due to several reasons. One possible cause could be incorrect tension settings on your sewing machine.
Tension controls the tightness of the stitches, and if it’s too tight or too loose, it can affect the appearance of the stitch. Check your machine’s manual for recommended tension settings and adjust accordingly. Another reason could be a dull or bent needle. A damaged needle can’t properly catch the thread, resulting in straight stitches instead of zigzag. Ensure you’re using the correct type and size of needle for your fabric.
Additionally, thread thickness might be a factor. Using thread that’s too thick for the needle can cause it to jam and produce straight stitches. Make sure the thread and needle are compatible. Lastly, machine malfunctions such as a problem with the feed dog or bobbin mechanism could also lead to straight stitches. Regular maintenance and cleaning of your sewing machine can help prevent these issues.
For instance, if the feed dog isn’t moving the fabric properly, it won’t create the zigzag pattern. By checking and addressing these common issues, you can troubleshoot why your zigzag stitch is coming out straight and ensure smooth sewing operations.
Maintenance Tips for Sewing Machines
Here are some practical tips to help you maintain your sewing machine:
- Clean the Machine Regularly:
- Lint buildup is a common issue. Use a small brush or a vacuum attachment to remove lint from the bobbin area and around the feed dogs.
- Wipe down the exterior with a soft, lint-free cloth to prevent dust accumulation.
- Change Needles Frequently:
- Replace the needle after 8-10 hours of sewing or when switching to a new fabric type.
- A dull or bent needle can lead to uneven stitches and potential damage to the machine.
- Oil Moving Parts:
- Lubricate your machine as per the manufacturer’s recommendations. Typically, every 8-10 hours of sewing.
- Use a small amount of sewing machine oil on designated areas to reduce friction and prevent wear.
- Check Tension Regularly:
- Ensure the thread tension is balanced. Incorrect tension can result in loose or tight stitches.
- Refer to your machine’s manual to adjust the tension settings correctly.
- Keep Bobbin Area Clean:
- Remove the bobbin and bobbin case regularly to clean any accumulated dust or lint.
- A clean bobbin area prevents thread jams and ensures smooth stitching.
- Inspect and Replace Belts:
- Check the belts for signs of wear or damage.
- Replace worn-out belts promptly to maintain consistent speed and prevent motor strain.
- Store Properly:
- When not in use, cover your sewing machine to protect it from dust.
- Store it in a cool, dry place to prevent rusting of metal parts.
- Follow the Manual:
- Always refer to your sewing machine’s manual for specific maintenance instructions.
- Manufacturers provide guidelines tailored to the machine’s model and design.
Regular maintenance ensures that your sewing machine remains in optimal condition, providing you with reliable and high-quality stitching for years to come.
If interested you can read how many watts is a stitching machine here. Moreover, you can read the power rating of a sewing machine motor here.
Conclusion
In the realm of sewing, understanding how to troubleshoot a zigzag stitch is akin to wielding a magic wand. This guide empowers you with the wisdom to mend any hiccup swiftly. Navigate through tension issues and needle misadventures like a seasoned pro.
With Zigzag Stitch Sewing Machine Troubleshooting guide, you’ll transform setbacks into stepping stones towards impeccable creations. Elevate your craft and let the rhythmic dance of the zigzag stitch unfurl with finesse. Say goodbye to sewing woes and embrace a world of boundless creativity.
References
- Developments in automatic control of sewing parameters
- Sound quality analysis of sewing machines
- Analysis Of Vibration Effects On Sewing Machines
- A flexible ergonomic redesign of the sewing machine workstation
Frequently Asked Questions
How Do I Clean and Maintain My Zigzag Stitch Sewing Machine?
To ensure the optimal performance and longevity of your sewing machine, it is crucial to regularly clean and maintain it. Implementing proper cleaning techniques and maintenance practices will help preserve the machine’s functionality, increase its lifespan, and prevent any potential issues.
What Type of Thread Should I Use for Zigzag Stitching?
When considering the type of thread to use for zigzag stitching, it is important to take into account the different types of fabric being used. Additionally, troubleshooting tension issues may require adjusting the thread tension or using a different thread type.
How Do I Adjust the Stitch Width and Length on My Sewing Machine?
To adjust the stitch width and length on a sewing machine, locate the appropriate dials or buttons. Turning the dial or pressing the button will increase or decrease the stitch width and length. Adjusting the tension can help troubleshoot needle breakage.
What Are Some Common Reasons for Skipped Stitches in Zigzag Stitching?
Common causes of skipped stitches in zigzag stitching can include incorrect needle or thread choice, improper tension settings, or a dull needle. Troubleshooting tips involve checking these factors and making necessary adjustments for optimal stitching results.
How Can I Troubleshoot if My Sewing Machine Is Not Turning on or Has No Power?
When encountering issues with a sewing machine not turning on or having no power, troubleshooting the sewing machine lights and power source should be the first step in identifying and resolving the problem.